Setting up Dummy and LogCollector for a TETRAPack connection
Disclaimer
-
Please note you follow this guide at your own risk! This is an experimental bridge, and we can't be held responsible if anything bad happens to your precious CTS!
-
This guide is for a Single-BS (one CTS) subnet. If you wish to interconnect more CTSes locally, you'll need to modify the network topology + E1 time slotting accordingly.
Hardware requirements
- Raspberry Pi (4 is ideal, 2GB is ok), with PSU and SD card
- icE1USB
- A USB-Ethernet Adapter
- A CTS (DUH)
Prep work
- Make sure you understand how TetraPack works, its topology, how Dummy and LogCollector operate with each other, etc.
- Before going any further, read this!
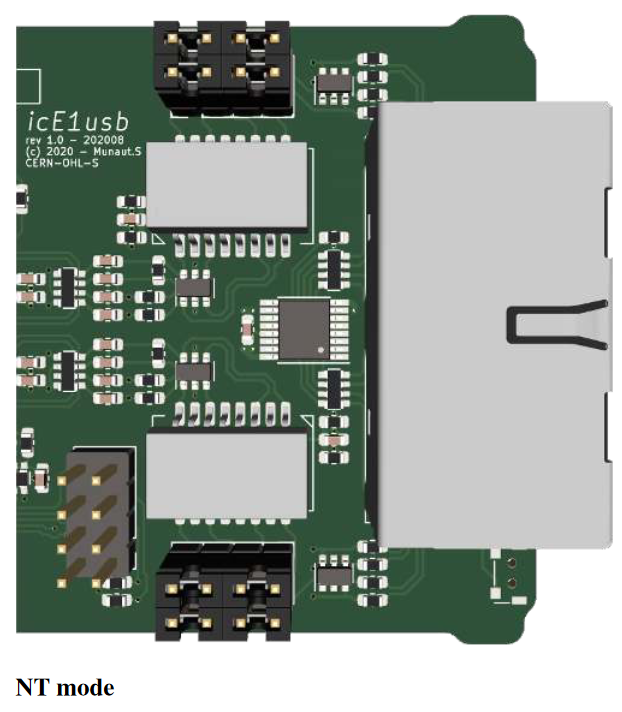
- Open up the icE1USB (from the back, with the SMA connector), and swap the jumpers so they match this picture:

CTS Setup
- Get a clear view of how the CTS is configured, and its necessary configuration files: bssparams.txt, set_x_gp, gm, sc, sub.csv, etc. Please make sure everything works as a standalone site before starting this entire endeavour!
- You also need good way to remotely connect to the CTS management interface (VNC is a good option).
- Plan ahead and make a list of the BrandMeister TGs you want your CTS to handle. Add them already to set_x_gp and gm.csv, reboot everything and make sure they already work locally in standalone mode.
- Open up bssparams.txt on your CTS, and do the following edits. Don't change anything else at this state:
## Base-Station Parameters ################################################################ #### Set the name to something simple, short, no special caracters /base-station/name = "CTSBS"; #### set this to id 1 /base-station/base-station-id = 1; #### add or replace: /base-station/standalone-mode = false; #### add or replace: /base-station/use-local-site-fall-back = false; ## Air Interface BLE Parameters ########################################################### /base-station/BLE/neighbour-cells = 191; ## SDS Gateway Parameters ################################################################# #### Remove all other lines, replace by: /system/sds-gateway/host-1 = { issi = 262999; ip-address = "44.225.64.18";}; /system/sds-gateway/host-2 = { issi = 250999; ip-address = "44.225.64.19";}; /system/sds-gateway/host-3 = { issi = 16777184; ip-address = "44.225.64.20";}; # These ISSIs will be used for SMS and GPS services (via GWPC emulation, IP addresses don't matter) ## E1 Layout Parameters ################################################################### ### Remove all other E1 layout lines, and replace byt this: /network/E1-layout/time-slot-01 = { source-type = "SIGNALLING"; }; /network/E1-layout/time-slot-02 = { source-type = "SIGNALLING"; }; /network/E1-layout/time-slot-03 = { source-type = "SIGNALLING"; }; /network/E1-layout/time-slot-04 = { source-type = "SIGNALLING"; }; #### Real BS transceivers /network/E1-layout/time-slot-17 = { source-type = "BS"; base-station-id = 1; l-transceiver-id = 11; }; #### Dummy's emulated BS transceivers /network/E1-layout/time-slot-22 = { source-type = "BS"; base-station-id = 8; l-transceiver-id = 11; u-transceiver-id = 12;}; /network/E1-layout/time-slot-23 = { source-type = "BS"; base-station-id = 8; l-transceiver-id = 13; u-transceiver-id = 14;}; /network/E1-layout/time-slot-24 = { source-type = "BS"; base-station-id = 8; l-transceiver-id = 15; u-transceiver-id = 16;}; /network/E1-layout/time-slot-25 = { source-type = "BS"; base-station-id = 8; l-transceiver-id = 17; u-transceiver-id = 18;}; #### Dummy's emulated GWPC encoders /network/E1-layout/time-slot-26 = { source-type = "DISP"; }; /network/E1-layout/time-slot-27 = { source-type = "ISDN"; }; /network/E1-layout/time-slot-28 = { source-type = "ISDN"; }; /network/E1-layout/time-slot-29 = { source-type = "ISDN"; }; /network/E1-layout/time-slot-30 = { source-type = "ISDN"; }; ## Network Topology Parameters ############################################################ #### Remove all other network topology parameters, and replace by this. Don't forget to change CTSNAME to the same name as in line 3! /network/topology/gateway-pc = { name = "Gateway Server"; E1-connection-1 = "BS-8"; }; /network/topology/base-station-1 = { name = "CTSBS"; E1-connection-1 = "BS-8"; }; /network/topology/base-station-8 = { name = "DUMMY"; E1-connection-1 = "BS-1"; E1-connection-2 = "GW-PC"; }; - Save and reboot the CTS, make sure it still works.
- Copy bssparams.txt over to your local PC, you'll need it for your Raspberry Pi.
- Write down the IP address of your CTS BSC computer (mine was 10.10.15.31, but yours will probably be different).
Software Stack Install
- Prepare an SD card with a 64-bit Raspbian Bookworm (Debian 12)
- Update/Upgrade the OS after boot:
sudo apt update && sudo apt upgrade reboot - Add the Osmocom repo, as per Osmocom's documentation:
sudo su OSMOCOM_REPO="https://downloads.osmocom.org/packages/osmocom:/latest/Debian_12" wget $OSMOCOM_REPO/Release.key mv Release.key /etc/apt/trusted.gpg.d/osmocom-latest.asc echo "deb [signed-by=/etc/apt/trusted.gpg.d/osmocom-latest.asc] $OSMOCOM_REPO/ ./" > /etc/apt/sources.list.d/osmocom-latest.list apt update - Install Osmocom E1D:
sudo apt install osmo-e1d - Add the TetraPack repository:
wget https://packages.tetrapack.online/install/public.key mv public.key tetrapack.asc sudo apt-key add tetrapack.asc sudo echo "deb [arch=arm64] http://packages.tetrapack.online/repository/ bookworm main" > /etc/apt/sources.list.d/tetrapack.list sudo apt update - Install TetraPack dummy and cts-logcollector
sudo apt install tetrapack-dummy cts-logcollector - Plug in the icE1USB to your Rpi, recover the interface serial number:
sudo lsusb -d 1d50:6145 -v 2> /dev/null | grep iSerial - Open (with for instance nano) /etc/osmocom/osmo-e1d.cfg, copy/paste this:
log syslog daemon e1d interface 0 icE1usb usb-serial [interface serial number] line 0 - Reload the service:
sudo systemctl restart osmo-e1d
Dummy - E1 Link setup
- Make sure Dummy is off with:
sudo systemctl stop dummy@default.service - Open/Create /opt/TetraPack/bssparams.txt, and copy/paste the contents from the file created at the CTS setup step. Edit the following lines
## System Parameters ##################################################################### ### Edit/Replace /system/name = "DUMMY"; ## Base-Station Parameters ################################################################ ### Edit/Replace /base-station/name = "DUMMY"; /base-station/base-station-id = 8; - Open/Create /opt/TetraPack/default.env
# E1D interface and line in format [interface number].[line number] DUMMY_LINE=0.0 # Path to CTS topology file (bss3.txt or bssparams.txt) DUMMY_TOPOLOGY=/opt/TetraPack/bssparams.txt # IP address and mask for CTS VTUN interface DUMMY_NETWORK="192.168.0.8 mask 255.255.255.0" # Specific options (multiple values can be delimited with comma): # replace-forwarded-link-status - replace IP-forwarded status for both E1 lines status of local BSs/GWPC to up # emulated-bs-line1-down - set E1-1 status of emulated BS to down # emulated-bs-line2-down - set E1-2 status of emulated BS to down # emulated-gwpc-line1-down - set E1-1 status of emulated GWPC to down # emulated-gwpc-line2-down - set E1-2 status of emulated GWPC to down DUMMY_OPTION= # Server connection URI in format http(s)://[user]:[password]@[address]/[path and parameters] # If you care about securely stored password, please put credentials into /opt/TetraPack/.netrc (man netrc) # REPLACE <YOUR DMR-ID> and <YOUR HOTSPOT/REPEATER PASSWORD> with your radio ID and password :) DUMMY_CONNECTION="http://<YOUR DMR-ID>:<YOUR HOTSPOT/REPEATER PASSWORD>@core.tetrapack.online:8081/dummy/?mode=bs+gwpc" # Instance name for D-BUS IPC interface DUMMY_INSTANCE=default - Save everything, cross your fingers and connect E1.1 from your BSC to the left port of icE1usb, like so:
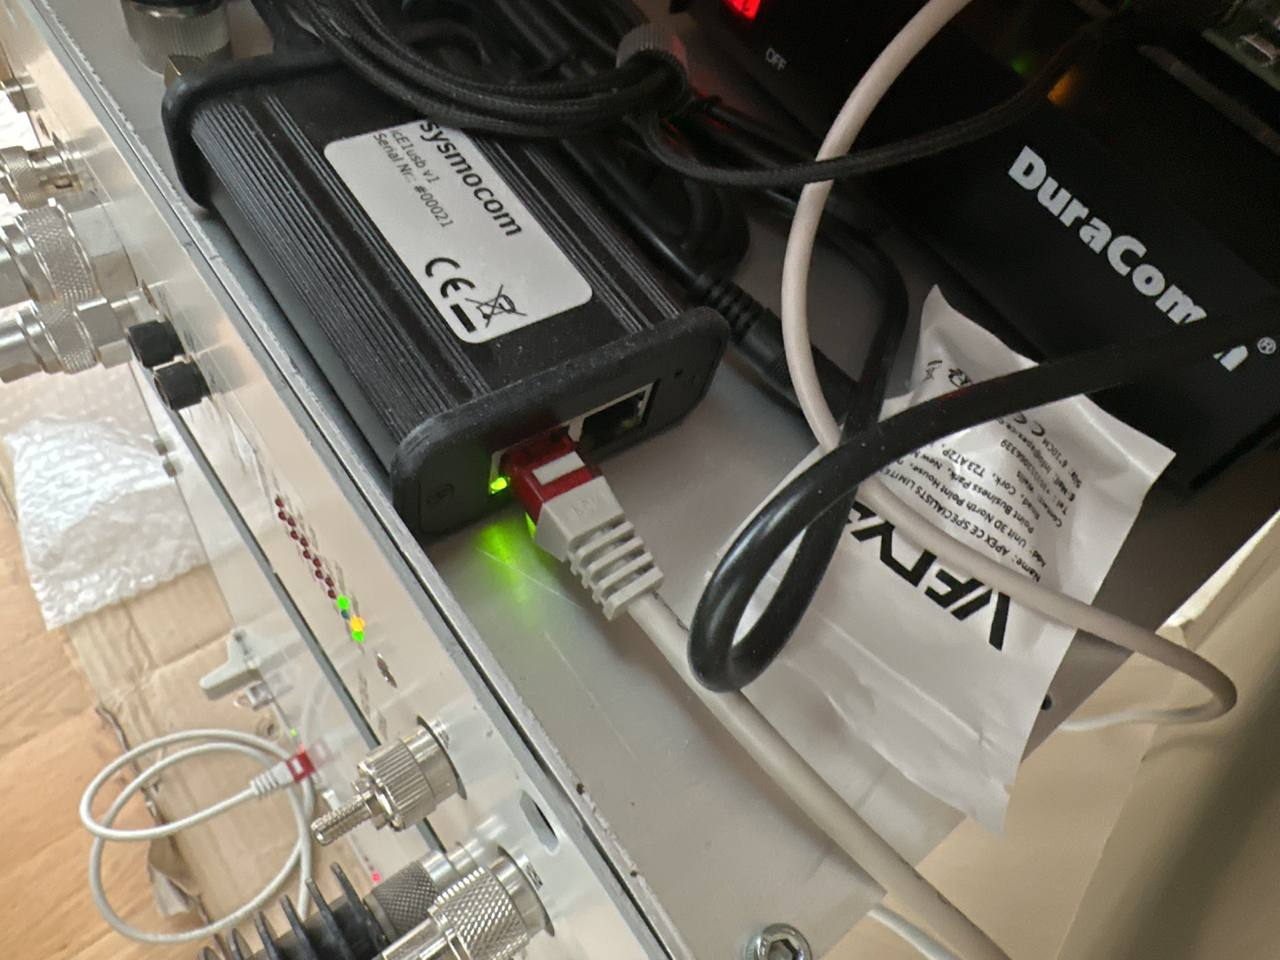
- The matching LED on the port should stop blinking, and the red LED on E1-1 should turn off.
- Try to start dummy from the console:
cd /opt/TetraPack ./run.sh default.env # First, read starup messages and check that configuration (default.env and bssparams.txt) parsed successfuly # Second, check connection: if you see, in blue, "Q.921 connection established", congratulations! Your E1 link works! # You should also see "Socket Connection Established" - this means, connection to server established - If everything works, Ctrl+C to stop the console instance, and enable the service + start it
sudo systemctl start dummy@default.service

LogCollector - CTS Management interface setup
- Connect the USB/Ethernet interface to the Pi, and connect an Ethernet cable from BSC management port to the usb dongle.
- Stop LogCollector:
sudo systemctl stop cts-logcollector@default.service - Set a static IP on the interface (probably eth1) on the same range as the BSC, by editing /etc/dhcpcd.conf and adding this:
# Don't forget to edit your ip address to match the range of your BSC! interface eth1 static ip_address=10.10.15.20 static routers=10.10.15.1 - Test if you can connect via telnet:
telnet [BSC IP ADDR] 51600 #If you get "220 Network Management Interface is ready.", you're good to go! - Through that telnet interface, you can check if you got a good E1 link with Dummy:
login a cd network netstat #Look at the table that pops up, and focus on the "Links" column #260-rsp #260-Node Links DD AI ISDN DISP #260--------------------------------------------- #260-BS-1 u - u u - - #260-BS-2 ? ? ? ? - - #260-BS-3 ? ? ? ? - - #260-BS-4 ? ? ? ? - - #260-BS-5 ? ? ? ? - - #260-BS-6 ? ? ? ? - - #260-BS-7 ? ? ? ? - - #260-BS-8 u u u u - - #260-GWPC d u u - u d #260- #260 . #BS-1 should have first link on U, BS-8 should have both U, and GWPC should have D U #If it's not the case, check the topology with: cd topology ls #Should show this: #260- d-- gateway-pc #260- d-- base-station-1 #260- d-- base-station-8 #If not, check your bssparams.txt on both the CTS and the Pi, something is wrong. - Close the Telnet session (Ctrl+c), open /opt/LogCollector/default.env, and change the ip address:
# [IP of basestation] [dummy instance name] [basestation ID (1-8)] COMMAND_ARGUMENTS=[YOUR BSC IP] default 1 - Enable/Restart LogCollector, wait for a bit and see if you get data coming from the CTS when you place a call or attach to a group:
sudo systemctl enable cts-logcollector@default.service sudo systemctl start cts-logcollector@default.service #Let's monitor syslog to see if it recovers logs from the CTS. You should see a bunch of lines show up. tail -f /var/log/syslog | grep cts - If it works, great! LogCollector is ready. Ctrl+C to quit tail, carry on to the rest
No comments to display
No comments to display